Saturday, April 20, 2013

A Layout about me and my true feelings..

Hello everyone...Marivic here sharing with you a LO base on Sandie's challenge...."About Me or Life as it is now"

Here is what I came up with..

We don't normally scrap about ourselves and we thank Sandie for this challenge, now we can share our feelings and talk about us.

I think I've already explained everything in the LO through my journaling.


You have a few more days to join the challenge...Don't miss out on the great Prize!!

A great prize from Zeus and Zoe Etsy Shop and a random prize from May Arts...

Thank you for stopping by..


Friday, April 19, 2013

Victorian Wall Decor


Happy Friday everyone, I hope you've had a fabulous week!!  Today I have a sweet Victorian wall hanger to share with you that I put together using my gorgeous Zeus and Zoe kit.  


The inspiration for this piece came from this beautiful calender image included in my kit.   Aren't these two just the cutest!!


To keep with the Victorian feel that I was going for, I chose to use an oval frame.  I turned it backwards to create a shadowbox and simply cut the image to fit inside


For a nice finished look I added trim around the edge of the frame.  The sequenced trim I used from my kit was a gorgeous blue but it didn't work with my design so I applied a layer of gesso, then painted over it with fluid acrylic.


To create a base for all of the layers, I cut a frame using my Cricut Frame of Mind Cartridge.  The beautiful KaiserCraft papers in my kit were just perfect.  All I had to do was ink them up a little bit.


Once the frame was on, I was able to start having fun with all the layers.  I used beautiful lace, crotchet trim, ruffle trim, a crotchet doily, beads, buttons and ScrapFX chippies all from my Zeus and Zoe kit.  Marivic's kits really come jam packed with a huge variety of items for your creating pleasure.  She can even make you a custom kit based on your style.  All you have to do is contact her and let her know what you're looking for.


Here's a closer look at the distressing I did on the key chippie.  This is layers of embossing powders, crackle and acrylic paints.  I just kept layering until I was happy with the look.


For a splash of color and whimsy I added a large butterfly.  I also mixed in some K&Company pieces and some ribbon from my stash to complete my design.


 To create the hanger, I used some beautiful May Arts ribbon.  I really love the mix of velvet and crotchet trim on their ribbons.  Zeus and Zoe carries a large variety of these gorgeous May Arts ribbon, go check them out.

Be sure to visit the Zeus and Zoe online store to pick up some of these gorgeous products for your next project.  Oh and don't forget, we still have a fun challenge going on right now!  Click HERE to find out all about it!!

Thank you for stopping by and for all of your sweet comments, enjoy your weekend!!

Adios :D

Thursday, April 18, 2013

Me - Minicanvas for April challenge


Hi there! It's Riikka here to share my creation for this months challenge. As you know, the challenge is to create and journal a project about 'life as it is now', about yourself. The additional requirement for the challenge was to use buttons in the creation.

I loved the challenge, because until recently I have done very few pages about myself. Although I'm sure my kids will be interested in the pages I have done about and for them, I'm sure that they will be equally or even more insterested in the pages about me - what I was thinking and feeling. At least I would be tremendously happy to find an old diary of my mum's!


I was lucky to be able to take a workshop with Finnabair some time ago and used some of the tricks learnt from her to my creation. I used of course the beautiful buttons from my Zeus and Zoe kit, but also some other things from my kit to make this minicanvas. I colored the project using for example some Lindy Stamp Gang spray inks from my kit.


The journaling part of the creation is on the back of the canvas, in an envelope as suggested in the challenge text by Sandie. I journaled about my dreams and about the moment I am currently in my life. I'm sure it will be interesting to read it in a few years or by my children in twenty years.


I hope I'll see your creation of this month's challenge soon! Don't forget our great price - the winner will receive a kit from Zeus and Zoe Etsy! The kit includes a package of flower, pin sticks, buttons, ephemera items, La Blanche Stamp, washi tapes and a package of Magicals from Lindy Stamp Gang. 


Here are challenge the rules: 

1. Projects must be linked up to our linky tool in the side bar, using the URL of the ACTUAL POST, not your entire blog.
2. You may submit as many entries as you would like and combine your entry with up to 2 other challenges.
3. Post this challenge to your blog and mention, in your post, that you are playing along at Zeus and Zoe TOGETHER with a link back to our Zeus and Zoe blog.
4. All entries must be received by MIDNIGHT EST 
5. Entries to be submitted via the linky tool at the top of the sidebar ONLY, not by email and not by linking up in the comments section please.

Information about our challenges:

1. Zeus and Zoe Challenges are open to anyone, anywhere in the world.
2. Our DT do their best to comment on all entries, you can make their job easier by turning off your word verification.
3. Challenges are held monthly and each month TWO winners are chosen. One winner is chosen by our DT and the other is chosen by random draw.
4. Challenge winners will always be announced within a week of the challenge closing and winners are then required to contact Marivic.
5. Prizes not claimed within two weeks will be forfeited.
6. The Merit winner will have an image of their project featured in the winners post, together with a link back to the homepage of their blog.
7. Winners will be awarded a Winner's Badge to post on their blog...full bragging rights included!

Wednesday, April 17, 2013

Altered Dress Form with Dana


Hi!  Dana here today sharing a paper mache dress form that I altered with supplies from my Zeus and Zoe Kit. The mix of vintage charms, jewelry and lace that came in my kit is fabulous and I highlighted some of those special pieces on the front of my form.


One of my favorite pieces from my kit is this stitched butterfly.  Someone spent a lot of time creating this beauty! I love the intricate design and pop of color it adds to my piece.


Here is the back of my form. I separated the petals of a Manor House Creations flower and used them to make the wings. I used the fun flower center to top the bow that I tied with some pretty May Arts ribbon.


I added the subtle shimmery color to my form with Lindy Stamp Gang Starburst Color Shots in Cape Cod Coral and Clam Bake Beige.

Thanks so much for stopping by today! If you're looking for a fabulous vintage kit that is personalized to your tastes, just contact Marivic and she'll get you all the details. Also, there is still time to enter the April Challenge.  Click HERE for all the details.

Tuesday, April 16, 2013

Beaded Cabochon Tutorial - Vintage Inspired Tag

Hi Everyone,

The kits available through Zeus and Zoe host a beautiful array of vintage and beyond items.  Often, cabochon's of some description can be found in the kits.  Actually, Marivic the owner of Zeus and Zoe custom makes many of the kits to suit each customers taste.  If this is of interest to you, do drop her an email to discuss.  The Zeus and Zoe Etsy store can be found 'HERE'.

I created a tag from items in my DT kit, including - old book paper, buttons, charms, lace, an old doily, and cabochon. I love cabochon's and have a lovely collection of them.  In previous crafting ventures I have beaded around the outside rim, to decorate and give a more finished appearance.
Today, I am sharing with you a tutorial on how to complete the beading.


Materials:
Cabochon
Tiny seed beads
Beading needle
Fray Stoppa or adhesive
Adhesive
Felt or calico
Thread - either beading or quilting thread

**Please read through all instructions before commencing**

1. Cut a small piece of fabric, a little larger than the cabochon.  Adhere cabochon to fabric using a strong adhesive, and allow to dry.
2. Turn cabochon over, and cover fabric with fray stoppa, allow to dry fully.  This eliminates the fabric from fraying whilst beading, and also when fabric is cut away when beading is completed.

3. Double thread needle with a long length of beading thread or quilting thread, knot well.

4. Take threaded needle and come up from the bottom of the fabric, at top, and as close to cabochon base as you are able. Thread 5 beads onto needle, and pull beads down thread. Lay the row of beads along the edge of the cabochon, and insert needle close to end of where beads lay and pull through to the back.
5. Come back up with your needle half way through previously sewn beads, with the needle being between the cabochon base and the beads. Thread needle through the 3 last beads as seen in photographs above.

6. Continue steps 4 and 5, till the whole outside rim has been beaded, as shown below.
7. Tie off thread onto back of cabochon.  DO NOT CUT THREAD

8. Bring needle and thread back up between cameo base and beaded rim, at top of cameo once more, as pictured below.
 9. Add 5 beads, count 3 beads, and thread needle straight through the 4th bead, as shown in below photograph.
10. Add another 5 beads, count 3 beads, and thread needle through the 4th - keep repeating this pattern, until you have returned to where you started, see above and below photographs.
11. To secure, go down next to last bead placement, come back up and over 'a' thread, and back to the back again.  Tie off, using small knots.  Apply a light application of adhesive over the knot to totally secure, as shown.
12. Carefully trim off excess fabric - be careful not to snip too close and catch a thread - that would mean starting all over again, so do be careful!!
13. Your cameo/cabochon is now ready to use on a project.... 

...and before I sign off, don't forget this months challenge - you can find all the details 'HERE'.  There are some fabulous prizes to be won, including a Zeus and Zoe kit, and also some wonderful trims from May Arts.

enjoy your day and thanks for visiting....
Sandie  


Monday, April 15, 2013

April challenge: For the love of textures, gold and all things pretty and vintage


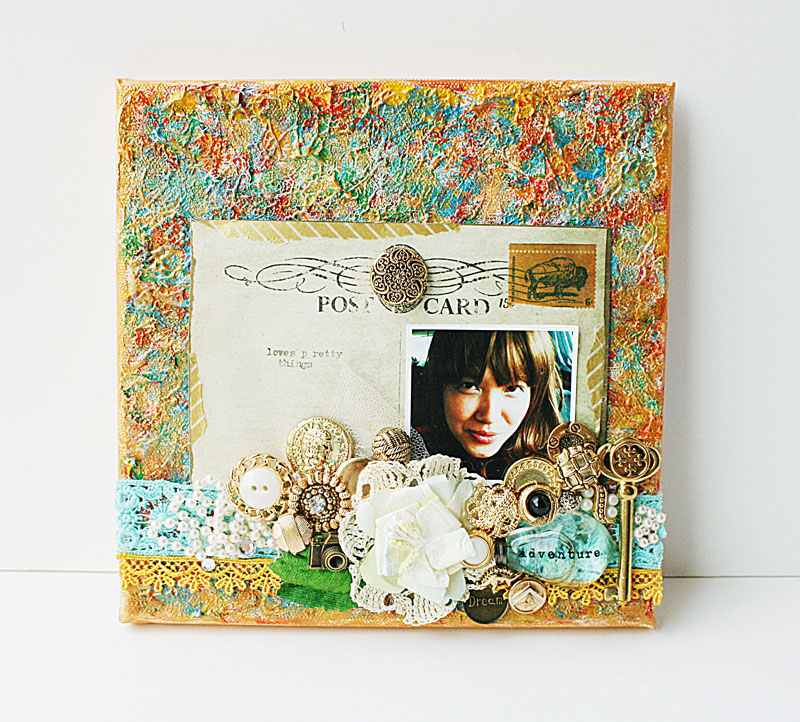
Hello there! It's Yvonne here to show you my inspiration for April's challenge. This 8x8 mixed media canvas features a couple of my current obsessions - textures created by paint, wrapping tissue and mediums, the colour gold and all things pretty and vintage.:)


The base was created with scrunched up wrapping tissue, then painted with various acrylic paint colours and gesso. For a shimmering finish, I added PearlEx in various shades of gold. I even took out my typewriter to type on my postcard [cut out from patterned paper in the Zeus and Zoe kit]. I tore some gold washi tape for added texture on the edges of the postcard. And added a pretty vintage button.


I must admit I went a little crazy with the clustering of buttons, charms and little trinkets here. But they are just soooooooo pretty right? Get yours at the Zeus and Zoe store. They add that special "wow" factor to your projects.

Won't you come play along with April's challenge?

Saturday, April 13, 2013

Guest designer for April: Tracey Sabella

I am so excited to be here as Zeus and Zoe's first Guest Designer. I was delighted to receive the amazing package of delightful trims, embellishments and paper crafting products to work with. I'll share a little about myself and then my projects.

I've been married to my wonderful husband, Gary, for 30 years. We have four wonderful children and with two recent weddings are happy to see our family grow. I started scrapbooking in 2007, and it didn't take long for me to realize that I had found an amazing creative outlet. I love to learn new techniques and have fun sharing what I learn on my blog, Garden of Grace. As you will see in the projects I've created for you today, I enjoy deconstructing and giving items a fresh "new" look. 

My first project to share with you today is for our Zeus and Zoe April challenge, "Life as it Is Now," about me as an individual. One more thing - buttons are a requirement. Be sure to check out the Zeus and Zoe Etsy Shop for fabulous buttons and more. For all the challenge details and rules check out Sandi's challenge here.

"Best of Days"

This page represents my changing role in life. I home educated for 19 years until our youngest entered our local high school for her final two years. She graduates next month. Our children are stepping out and creating lives of their own. You could say my life has changed dramatically over the past two years. I've chosen to embrace the change. No moping empty nester here. I've hand written my thoughts about these changes on a tag attached to the back of my layout. The photo was taken at our daughter's wedding last October, and the butterflies represent the wings of change. 


A package of Prima Ruby Violet trinkets including a flower was included in my package. The star focal flower of this layout was created by pulling that flower apart. I painted the fabric portion and tucked a smaller Prima flower into the center. I rubbed with distress ink to achieve the vintage look. I placed Zeus and Zoe buttons here and there into my clusters. The other smaller flowers are from my stash. 


Moving to the other corner of the photo you can see the fabulous battenburg lace doily is the one thing I left untouched, allowing this gorgeous white lace to frame my photo. One of my goodies was a selection of vintage lace pieces. These two sweet butterflies were bright orange. I simply gessoed and inked them and adore how sweet they look "fluttering" on both ends of this cluster. The background leaves were stenciled using molding paste and a Dylusions stencil. 


When I saw this gorgeous medallion, it begged a prominent place on my page. Of course I did a bit of altering. It started out with a glittery hot pink resin center and coordinating heart dangle. I adored the large clear crystal and left it in place. The heart was replaced with the butterfly while the center was painted with Lumiere paint and dotted with little beads from my stash. 

I happened to have a perfect stencil in my stash used to add molding paste behind the medallion. Once dry, I misted with the Lindsy's Stamp Gang Aloha Avocado mist included in my package. I let it pool and drip down the page. Finally, I inked the molding paste with distress inks for more depth. 


Aren't these lace pieces simply gorgeous?? They started life in bold bright colors which masked the gorgeous design. A couple coats of gesso and some inking brought out their amazing beauty. I also touched the brown lace and daisy with a bit of gesso. The little metal butterfly beads were alcohol inked with several shades of green and gold. The two chipboard butterflies are from my stash and brushed with Lumiere paint. 


One more close-up of the clusters around this photo of "Me." The larger metal butterfly charm in the corner is also from my package.

~ ~ ~ ~ ~ ~ ~

My second project to share with you is a card I created for my sister. She has been dreaming of owning her own home and has held on to her hope and faith as she saw several deal fall through after being told her offers had been accepted. This time it looks like the deal will go through and this will be the card included with her house warming gift. 

"Hope Is the Thing"

Close-Ups:

I deconstructed the May Arts Velvet Ribbon with Crochet Lace. The velvet created a gorgeous base for my layered flower, and the lace looks so pretty here. The pink resin rose and chandelier beads came glued and wired together as a single flower. Now separated, I used the wire to attach and dangle the beads and placed the resin piece in my flower cluster after highlighting the edges with a bit of metallic brown paint.


This view shows off the gorgeous lace flower. In addition to the gesso and inking, I added some sparkly seed beads to the center.

The gold cording had been woven into a lace with blue sequins. You guessed it. I pulled it apart and tied on these sweet tree charms that I altered by dabbing on brown metallic paint. The daisy stick pin was also dabbed with paint. The layered flower was created with a variety of Zeus and Zoe pieces - all but the inked paper daisy layer.


My package included this fabulous TPC Vintage Birdcage stamp set. The sentiment couldn't be more perfect to describe the enduring hope my sister has embraced on this journey to find a home. I used Truffle Mixed Media Inx to stamp and heat emboss with clear embossing powder, then fussy cut around the image. I colored by spritzing with the Lindsy's Stamp Gang mist and a bit of distress ink on the edges. The bird and cage were also part of this set. I stamped and heat embossed these images onto watercolor paper then lightly inked over the white background and fussy cut.

Nearly all the products used on this card are from Zeus and Zoe, such a great source of gorgeous and unique products!

~ ~ ~ ~ ~ ~ ~

Here are the amazing prizes up for grabs when you link your project about you in the upper right side bar. Don't forget to read the "Life as it Is Now" Challenge details and rules here.

The winner of this challenge will receive this fabulous prize package sponsored by Zeus and Zoe. As  you can see it is full of amazing products from an entire set of Lindsey's Stamp Gang Magicals to flowers, buttons, stick pins, stamps and more.


And a random winner will be selected to win this lovely May Arts lace and ribbon:

I hope I've inspired you to take on the challenge of creating a project about yourself. I know we're usually the one behind the camera, but each of you have a special story to tell about where you are in life, and I'd love to see those stories told here.

Have a wonderful day creating memories that will last!